PIONEER OPUS-QUAD
INSTALLATION
Firmware & Drivers
Firmware: Please install the latest firmware for Opus-Quad from Pioneer Dj website.
Drivers: Install the latest drivers for Windows computers from Pioneer Dj website.
MAC OS users do not need to install any drivers.
(in case you have not done already)
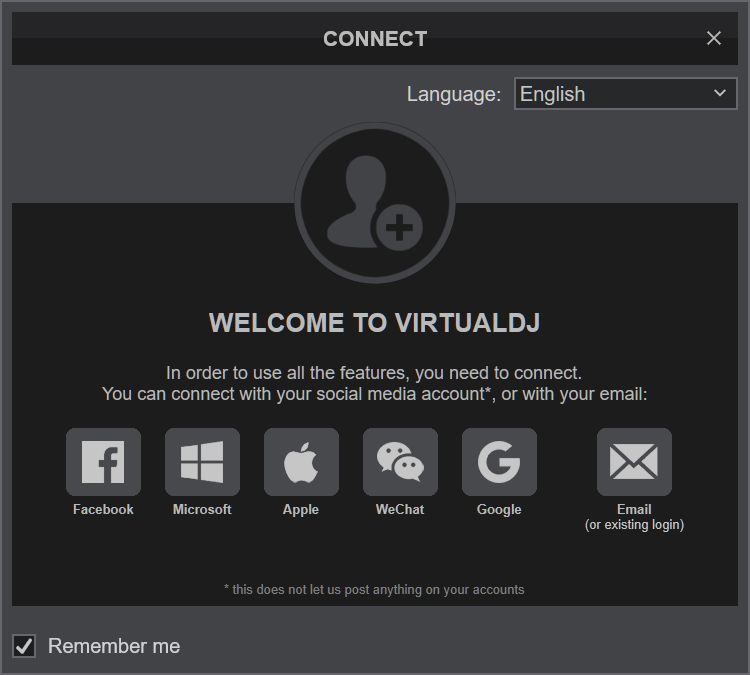
Once VirtualDJ is launched, a Login Window will appear. Please login with your preferred method from the ones provided.
A Pro Infinity or a Pro Subscription License is required to fully use the Pioneer Opus-Quad.
Without any of the above Licenses, the controller will operate for 10 minutes each time you restart VirtualDJ.
Buy a license
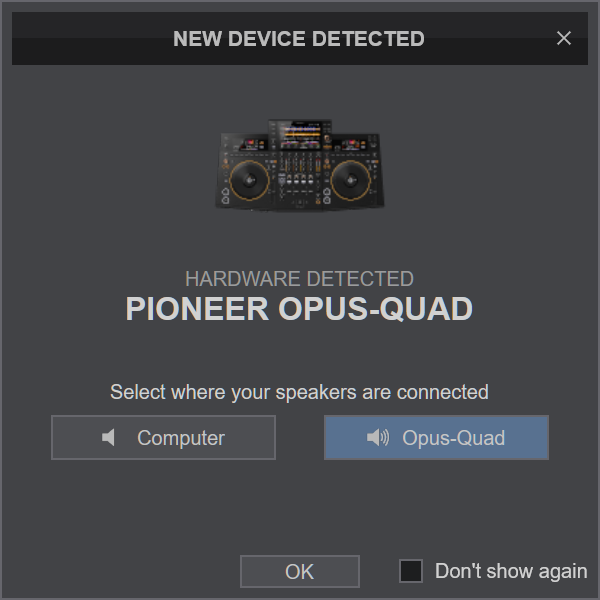
Have your speakers connected to the rear-panel of Opus-Quad and click on the "Opus-Quad" button for VirtualDJ to apply the predefined audio setup with the built-in sound card of the Pioneer Opus-Quad. You can still change that from Settings->AUDIO tab.
Select the Software Control mode from the Opus-Quad if the relative message appears.
- Press the SOURCE button located at the top right side, next to the main Display
- Select the SOFTWARE CONTROL mode
- Press the LOAD 1/3 button at the right side of the Display
- Press the LOAD 2/4 button at the right side of the Display
Click to OK.
MIDI Operation
The unit should be visible in the CONTROLLERS tab of Config and the “factory default” should be available/selected from the Mappings drop-down list. The factory default Mapping offers the functions described in this Manual, however those can be adjusted to your needs via VDJ Script actions.
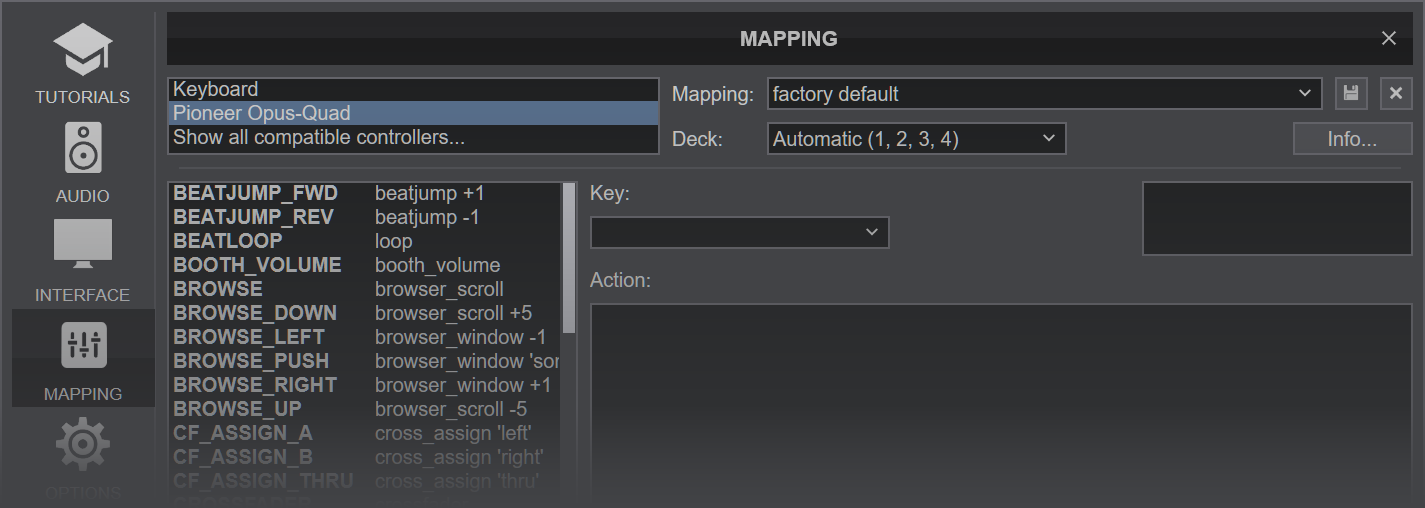
Find more details at VDJ Pedia
AUDIO Setup
The unit has a pre-defined Audio setup and a special button in the AUDIO tab of Config to provide that. Alternative Audio setups can be applied in the same window.
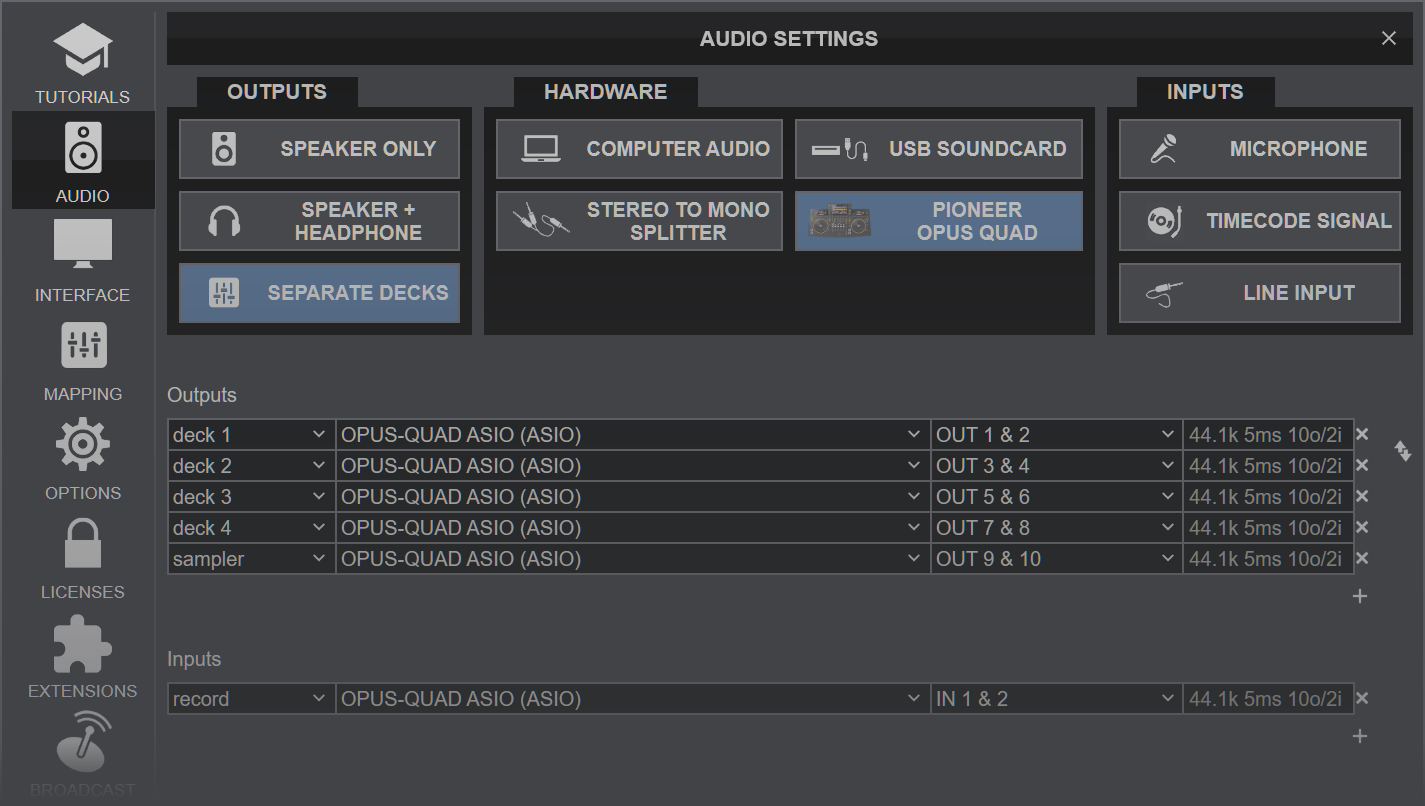
For further software settings please refer to the Manuals of VirtualDJ
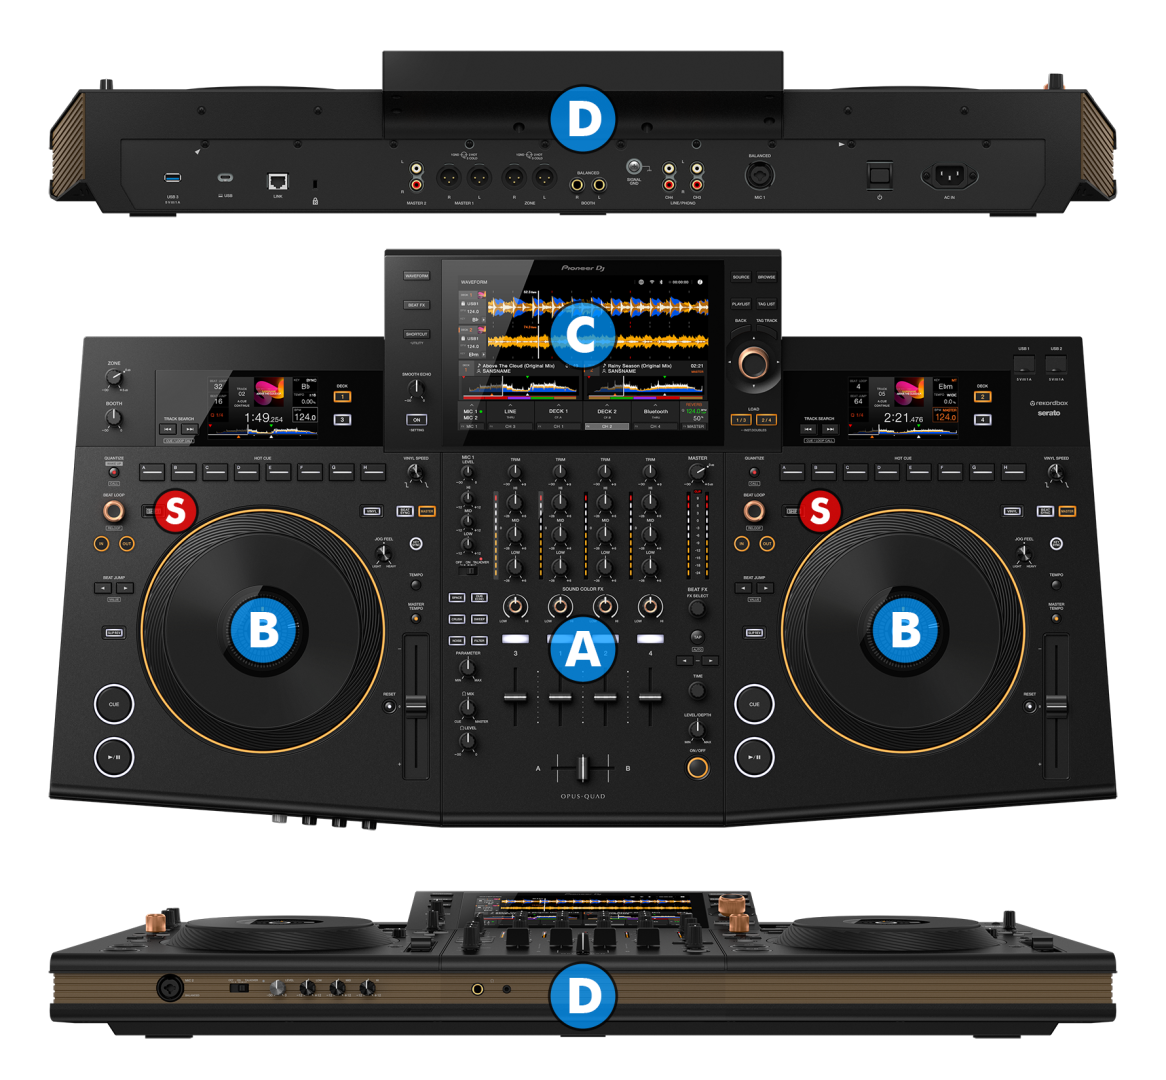
LAYOUT
Even though the Pioneer Opus-Quad is capable of sending MIDI signals from all faders, buttons and knobs, the mixer part of the unit is not controlling the internal mixer of VirtualDJ. The audio mixing is operated from the hardware.
The Crossfader, Equalizer, Filter, Volume faders etc. will move the relative faders of the VirtualDJ GUI, but not vice versa (Fake mixer mode)
S SHIFT. Hold this button down to access secondary functions of the Pioneer Opus-Quad.
The functionality of each button, knob and slider per section (as shown in the image above) will be explained in detail in the following chapters
A. Mixer & Effects
B. Deck Controls
C. Browser & Main Display
D. Front & Rear Panels
MIXER & EFFECTS
MIXER
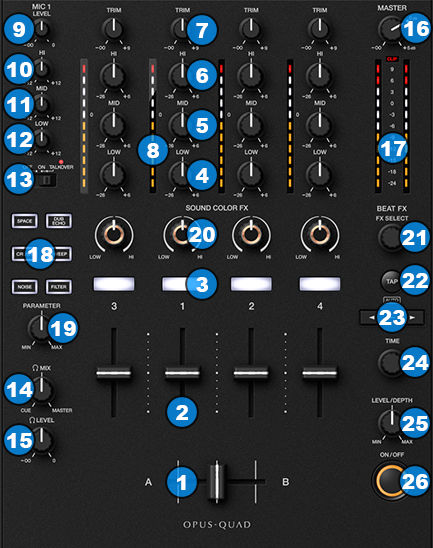
All mixer and effects operations described in this chapter are performed via the device hardware.
However, the movement of all basic mixer elements is still visible in the VirtualDJ GUI.
- CROSSFADER. Blends audio between the channels assigned to the left and right side of the crossfader.
- VOLUME. Adjust the Volume of each channel.
- CUE (PFL).Press these buttons to send each channel to the Headphones Output channel.
- LOW EQ. Adjust the Low frequencies for each mixer channel.
- MID EQ. Adjust the Mid frequencies for each mixer channel.
- HI EQ. Adjust the High frequencies for each mixer channel.
- TRIM. Adjust the Gain of each mixer channel.
- CH INPUT VUMETER. Shows each channels input (pre fader) volume.
- MIC 1 VOLUME. Adjust the Volume Level of MIC1 Input of the OPUS-QUAD.
- MIC 1 HI EQ. Adjust the High frequencies of MIC1 Input of the OPUS-QUAD.
- MIC 1 MID EQ. Adjust the Middle frequencies of MIC1 Input of the OPUS-QUAD.
- MIC 1 LOW EQ. Adjust the Low frequencies of MIC1 Input of the OPUS-QUAD.
- MIC 1 CONTROL. Turn ON and OFF the MIC1 Input of the OPUS-QUAD or enable the auto Talk Over.
- HEADPHONES MIXING. Adjust how the Channels and the Master Output blend at the Headphones Channel.
- HEADPHONES VOLUME. Adjust the volume of the Headphones Channel.
- MASTER VOLUME. Adjust the level of the Master Output.
- MASTER OUTPUT VUMETER. Shows the master output volume of the unit.
EFFECTS
- COLOR FX SELECT. Select one of the predefined Color Effects (Space, Dub Echo, Crush, Sweep, Noise and Filter).
- COLOR FX PARAMETER. Adjust the parameter of the selected Color Effect.
- COLOR FX AMOUNT. Adjust the amount of the selected COLOR FX for each channel. When in middle position, the COLOR FX has no effect on the sound.
- BEAT FX SELECT. Use this encoder to select one of the available Beat FX. The name of the selected Effect is displayed on the Main Display.
- TAP. Tap this button to set a new BPM value for the currently selected Beat FX (for the Effects that are beat-aware). The beats value is displayed on the Main Display.
Hold Shift down and press this button to return to automatic BPM detection. - BEAT. Use these buttons to half/double the Beats Parameter of the selected Effect (for the Effects that are beat-aware). The beats value is displayed on the Main Display.
- TIME. Use this encoder to alter the timing of the selected Effect (for the Effects that are beat-aware). The time value is displayed on the Main Display.
- FX LEVEL/DEPTH. Use this knob to adjust the Dry/Wet Parameter of the selected Effect.
- BEAT FX ON. Use button to enable/disable the selected Beat FX. Its led will flash when enabled.
Deck Controls

- PLAY/PAUSE. Plays / Pauses the track.
Press and hold SHIFT and then press this button to "stutter-play" the track from the last set Cue Point. - CUE. When the Deck is paused, you can set a temporary Cue Point by moving the Platter to place the Audio Pointer at the desired location and then pressing the Cue Button. During playback, you can press the Cue Button to return the track to this Cue Point. (If you did not set a Cue Point, then it will return to the beginning of the track.). If the Deck is paused, you can press and hold the Cue Button to play the track from the Temporary Cue Point. Releasing the Cue Button will return the track to the temporary Cue Point and pause it. To continue playback without returning to the Temporary Cue Point, press and hold the Cue Button, then press and hold the Play Button, and then release both buttons.
Hold down SHIFT and then press this button to return to the beginning of the track. - SLIP REVERSE. Press and hold this button to play the track backwards. On release the track will continue from the position it would have been if the button was never pressed.
Hold down SHIFT and press this button (momentarily) to play the track backwards. Press again to return to forward direction. - BEAT JUMP: Use these buttons to move track backwards/forward in beats. Keep the buttons pushed for continuous seeking.
The amount of beats to jump is adjustable.
Hold down SHIFT and press Jump back button to halve the amount of beats.
Hold down SHIFT and press the Jump forward button to double the size of beats.
The amount of beats that the track will jump is shown on deck screen. - LOOP IN/OUT. Use these buttons to set Loop In and Loop Out points (for manual looping).
When a loop is active, press either buttons to use the JOG to adjust the length of the loop by moving the Loop In or Loop Out point respectively. The LED of the button will start blinking fast.
Press the same button again to exit loop adjust mode and return the jog to normal operation. - BEAT LOOP. Press this encoder down to activate an automatic loop. The amount of beats that will be used is shown on VirtualDJ GUI.
Turn this encoder counter clockwise to halve the size of the loop
Turn this encoder clockwise to double the size of the loop.
If a loop is active, press this encoder down to exit the loop.
Hold down SHIFT and press this encoder to activate the last used loop and jump back to it (Reloop).
If a loop is active, hold down SHIFT and turn the encoder to move the loop back or forward by a amount of beats that equals the amount of beats in the current loop.
- S SHIFT. Press and hold this button to access secondary functions of other controls on the OPUS-QUAD.
- QUANTIZE. Press this button to toggle Quantize on/off. When Quantize is enabled, setting loops, jumping between hot cue points and starting playback of the deck will snap to the grid (CBG) of the track.
Hold down SHIFT and press this button to switch "Hot Cue" buttons to STEMS+FX operation mode. Hold down SHIFT and press once more to return "Hot Cue" buttons to normal operation. - TRACK SEARCH. Use these buttons to load the previous or next track on the deck. The playback status of the deck is kept during load.
Hold down SHIFT and use these buttons to jump between the available hotcues of the track. - DECK SCREEN / DISPLAY. Shows useful information about the status of the current deck and the track that's loaded on it.
- DECK SELECT. Switch Left decks (1 and 3) and Right Decks (2 and 4).
- HOTCUES. These buttons offer two different operation modes, and allow you to control either Hotcues, or Stems. To switch between the two modes, please hold down SHIFT button and then press QUANTIZE button at the same time.
Normal Operation Mode: Use these buttons to set hotcues for the track if they don't have been set, or jump to them if they have been set. If the deck was stopped before jumping to a hotcue it will also start playing. Upon releasing the hotcue button the playback will continue if "hotcueMode" setting is set to "play" (default value) or it will stop and jump back to the hotcue position if "hotcueMode" setting is set to "stutter".
Hold down SHIFT and press a button to delete the hotcue associated with it.
Stems+FX Operation Mode: Use these buttons to mute/isolate specific stems of the track, or apply software effects on specific stems.
The first 4 buttons mute stems "Vocals", "Instruments", "Bass" and "Rhythm" respectively.
Hold down SHIFT and press one of the four buttons to isolate (solo) a stem instead.
The rest 4 buttons apply "Vocals Echo Out", "Vocals Reverb", "Melody/Rhythm Beatgrid" and "Melody/Rhythm Echo Out" software effects respectively. - JOGWHEEL. Pressure sensitive platter for scratching (Vinyl Mode) or bending (CD Mode).
- VINYL. Toggle the Jogwheel between the Scratch and Bend modes.
Hold down SHIFT and press this button to toggle Slip Mode. When Slip Mode is active several software functions (such as Jogwheel movements, HotCues and Loops) will apply temporary on the track, and the track will return to the position it would have been if those functions were not triggered. - VINYL SPEED. Adjust the ramp up / ramp down time used by the deck when using the PLAY/PAUSE button and the JOG, depending on a user adjustable setting. Please see OPUS-QUAD Settings
- JOG FEELING ADJUST. Adjust the tension of the jogwheel (hardware operation).
- SYNC. Press this button to automatically match the corresponding Deck's tempo with the opposite Deck's (or the Master Deck’s if using a 4 decks Skin) tempo and phase.
Hold down SHIFT and press this button to reset the tempo of the track back to it's original value. - MASTER. Press this button to manually set a deck as "Master Deck" and stop automatic "master deck" selection. When a deck is set as "Master Deck" all sync operations of the other decks will take place against this deck.
Press and hold down this button down for more than one second to resume automatic "Master Deck" selection. - KEY SYNC. Press this button to match the musical Key of the track with the Key of the Master deck (or the other deck if using a 2 decks skin). The change of the Key will be the smallest required to make it compatible with the other Key.
Hold down SHIFT and press this button to reset the Key of the track back to it's original value. - TEMPO RANGE. Press this button to select one of the available ranges for the TEMPO slider.
- MASTER TEMPO. Press this button to "lock" the track's pitch to its original key. The track's tempo will remain at the speed designated by the TEMPO slider
- TEMPO SLIDER. Controls the track's playback tempo.
- TEMPO RESET. Reset the track's playback tempo back to it's original speed.
BROWSER & MAIN DISPLAY
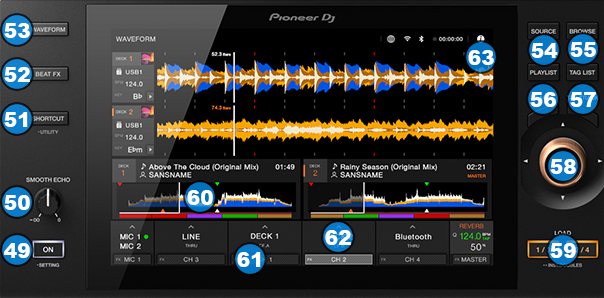
- SMOOTH ECHO: Press this button to enable a Smooth Echo effect when performing some operations on OPUS-QUAD (Hardware operation).
Hold down this button to enter a menu that you can adjust when the Smooth Echo effect will get triggered (Hardware Operation). - SMOOTH ECHO LEVEL: Adjust the amount of the Smooth Echo effect.
- SHORTCUT: Use this button to show some additional settings for Display view.
Hold this button down for more than one second to enter the unit's UTILITY menu to adjust various operations of OPUS-QUAD (Hardware operation) - BEAT FX: Use this button to show a screen where you can apply Beat Effects in various timing combined with a Filter Effect (Hardware operation)
- WAVEFORM: Use this button to return to the main view of the display, that shows the waveforms of the tracks.
- SOURCE: Press this button to select the source for a deck. You can either select to load tracks from a USB flash drive (stand alone operation) or from a software deck.
To use a deck with VirtualDJ you need to select "SOFTWARE CONTROL" and then use the LOAD buttons select and confirm that a deck is assigned to VirtualDJ. - BROWSE: Press this button to display the Browser view on the Display. Press again to return to the Main (waves/decks) view.
- BACK: Press this button to set focus to the Folders list of VirtualDJ Browser and get the Folders view on the Display. If focus is on Folders, use this button to expand/collapse sub-folders
Hold SHIFT down and then push this button to load the previous used folder in Songs view. - TAG TRACK: Press this button to add the track that's selected on the browser on the Playlist (Automix) list.
Hold SHIFT down and then press this button to add the track that's selected on the browser on the Sidelist.
Press and hold this button down for one second to open/close the File Info window on the Browser of the VirtualDJ GUI which shows additional track information. - BROWSE/ZOOM: When in Main (waves/decks) view, use this rotary to zoom the waves in/out.
When in Browser view, use this rotary to scroll through folders and tracks.
Tilt the rotary to the left or right to scroll between Folders list, Song list and Sideview List.
Tilt the rotary up or down to scroll 5 items at a time
Push the rotary in to switch focus to Song list.
Hold SHIFT down and then tilt the rotary left or right to cycle through the available lists of Sideview (Automix, Sidelist, Sampler, Karaoke and Shortcuts)
Hold SHIFT down press the rotary in, to switch focus to the Sideview. - LOAD: Use these buttons to load the selected track to either left or right deck. Fast double press these buttons to clone the other deck to the respective deck.
Please note that "PLAYLIST" and "TAG LIST" buttons don't send MIDI and they are reserved only for stand alone operation with USB flash drives.
TOUCH DISPLAY
The display of the OPUS-QUAD is not a full touchscreen, but there are a few operations offered by pressing some areas on the display.
- SONG PROGRESS WAVE : Touch and scroll though this area to seek through Track. When Track is audible, this operation is blocked by default. You can unlock this operation from VirtualDJ Settings->OPTIONS. See OPUS-QUAD Settings
- BEAT FX ASSIGN : Touch this area to select on which deck the Beat Effects of the unit will be assigned to (Hardware Operation)
- CHANNEL SOURCE / CROSSFADER ASSIGN : Touch this area to select the source of each mixer channel of OPUS-QUAD (applies only on channels 3 & 4) and their crossfader assignment (hardware operation)
- DECK INFO : Tap this area to get the Loaded Track Info view. Tap again to return to Main (waves/decks) view.
FRONT & REAR PANELS
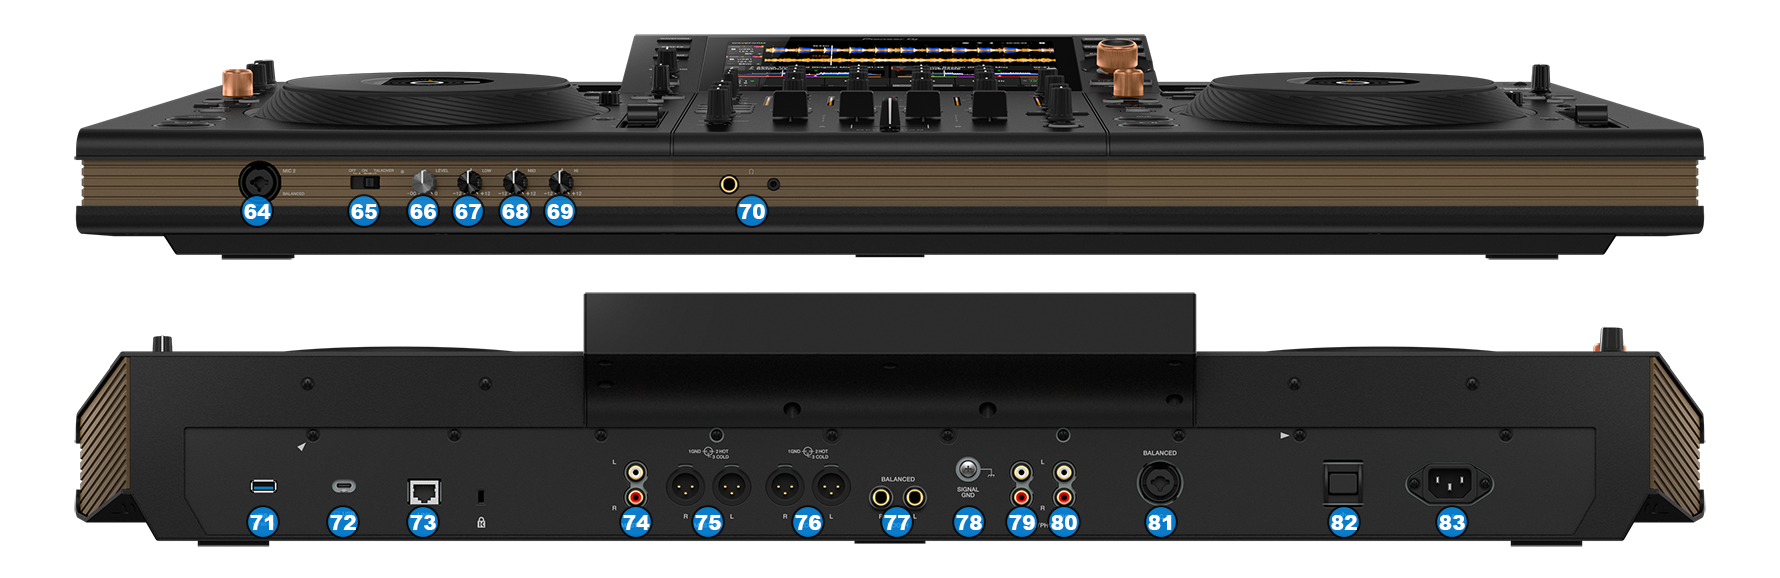
- MIC 2 CONNECTOR Connect your Mic. Both TRS and XLR connection plugs are supported.
- MIC 2 CONTROL. Turn ON and OFF the MIC2 Input of the OPUS-QUAD or enable the auto Talk Over.
- MIC 2 VOLUME. Adjust the Volume Level of MIC2 Input of the OPUS-QUAD.
- MIC 2 LOW EQ. Adjust the Low frequencies of MIC2 Input of the OPUS-QUAD.
- MIC 2 MID EQ. Adjust the Middle frequencies of MIC2 Input of the OPUS-QUAD.
- MIC 2 HI EQ. Adjust the High frequencies of MIC2 Input of the OPUS-QUAD.
- HEADPHONES SOCKET. Connect your 1/4" or 1/8" headphones to this output for cueing and mix monitoring.
- USB 3. Use this socket to connect a USB Flash Drive. If you're using a USB cable, please make sure that it's no longer than 2m long. This source is not used within VirtualDJ.
- USB (TYPE C) CONNECTOR. Use a USB type C cable to connect OPUS-QUAD with your computer.
- LAN (LINK EXPORT) CONNECTOR. Use this port to connect OPUS-QUAD with a router in order to use LINK EXPORT abilities. This connection is not used by VirtualDJ.
- MASTER OUT2. Master signal output connectors (RCA – Unbalanced). Use it to connect with another mixer, or consumer grade amplifier.
- MASTER OUT1. Master signal output connectors (XLR – Balanced). Use this to connect on your pro grade amplifier or self-powered speakers.
- ZONE OUT. Zone signal output connectors (XLR – Balanced). Use this to connect on a different set of pro grade amplifiers or self-powered speakers that require separate control and/or separate music output (please refer to the OPUS-QUAD manual on how to assign a different audio output than Master on ZONE output).
- BOOTH OUT. Booth signal output (TRS – Balanced). Use this to connect your booth speakers, or an amp that needs different sound output level than master output.
- GND SCREW. Use it to screw your GND (ground) cable from turntables that provide it in order to eliminate ground static noise.
- CH4 INPUT. Connect an analog source on CH4 of the OPUS-QUAD mixer. You can connect a turntable or a CD-Player.
- CH3 INPUT. Connect an analog source on CH3 of the OPUS-QUAD mixer. You can connect a turntable or a CD-Player.
- MIC 1 CONNECTOR. Connect your Mic. Both TRS and XLR connection plugs are supported.
- POWER SWITCH. Turns on/off the power on the device. Please turn on the device only after doing and securing all connections on the back.
- AC INPUT. Connect a standard IEC power supply cable.
ADVANCED OPTIONS
There are a few options available for the OPUS-QUAD, to unlock Needle Search on the display, turn off auto-switch to Deck view after loading a Track, or adjust which times are controlled by the "Vinyl Speed" control.
Open VirtualDJ Settings, select the OPTIONS tab and then the CONTROLLER sub-category.
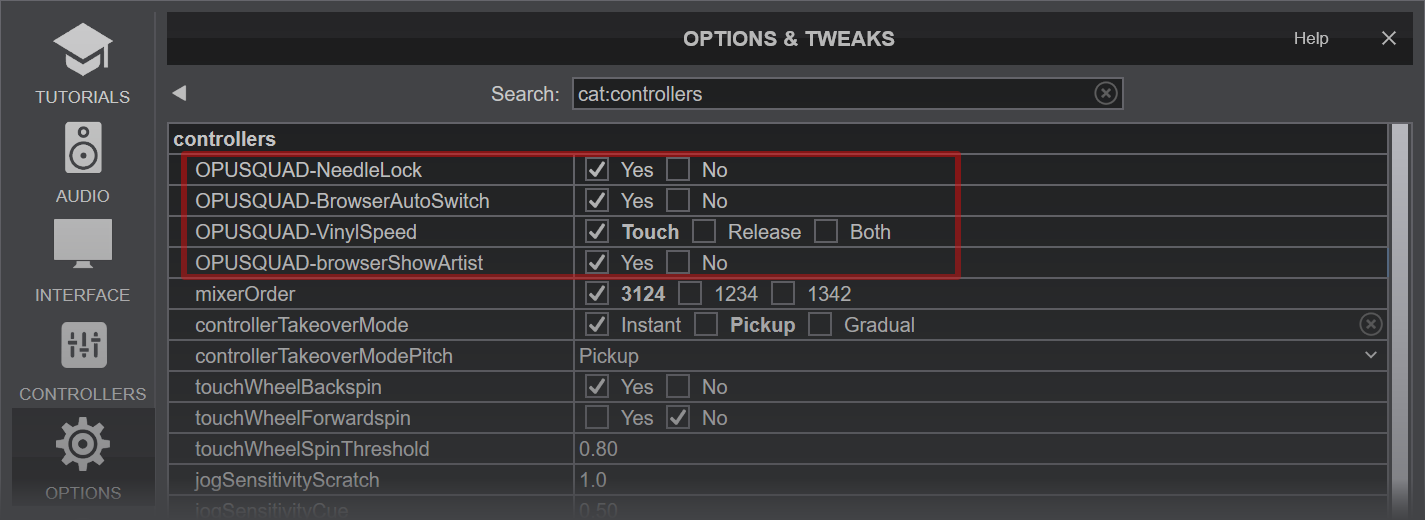
NEEDLE LOCK
This option is useful to prevent accidental track jumps when the Needle (Song Progress Wave on Display) is accidentally touched while the deck is audible.
When OPUSQUAD-NeedleLock setting is set to Yes (default selection), the Needle is locked and touching the Song Progress will have no effect when the deck is audible on air. If the deck is not audible then touching Song Progress wave works and allows you to seek through the track.
When OPUSQUAD-NeedleLock setting is set to No, the Needle is unlocked and you can touch the Song Progress wave and jump to a position on the loaded track regardless if the deck is audible or not.
BROWSER VIEW SWITCH
When OPUSQUAD-BrowserAutoSwitch setting is set to Yes (default selection), the Browser view Switch is set to Automatic. In this mode, when a Track is selected and loaded to a Deck, the Decks/Waves view will be automatically offered without pressing any other buttons.
When OPUSQUAD-BrowserAutoSwitch setting is set to No, the Browser view Switch is set to Manual and the Browser View will remain active after loading a track. In this case either the WAVEFORM or the BROWSE button next to the Main Display needs to be manually pressed to return to the Decks/Waves view.
Vinyl Speed
This option allows you to select which ramp times are controlled by the "Vinyl Speed" knob on the decks area of the OPUS QUAD.
When OPUSQUAD-VinylSpeed setting is set to Touch, (default value) the "Vinyl Speed" knob adjusts the time that the tracks needs to come to a complete stop after pausing the deck.
When OPUSQUAD-VinylSpeed setting is set to Release, the "Vinyl Speed" knob adjusts the time that the tracks needs to come to full speed after starting the deck.
When OPUSQUAD-VinylSpeed setting is set to Both, the "Vinyl Speed" knob adjusts both the time that the tracks needs to come to full speed after starting the deck, and the time that the tracks needs to come to a complete stop after pausing the deck.
Browser Show Artist
When OPUSQUAD-browserShowArtist setting is set to Yes (default selection), the Browser on the Opus Quad screen will show the tracks formatted as "Artist - Title"
When OPUSQUAD-browserShowArtist setting is set to No, the Browser on the Opus Quad screen will show the tracks formatted as "Title" only.
